ProParts Direct

10 Drought-Resistant Landscaping Ideas to Save Water

“Drought Resistant Landscaping Ideas
Let’s be real, keeping your lawn lush and green year-round isn’t easy when your region’s been practically sunbathing for months with no rain in sight. If you live in a place where droughts are common (or just want to stop pouring your paycheck into the sprinkler system), drought-resistant landscaping is your new best friend.

This isn’t about giving up a beautiful yard. Nope, it’s about working smarter not harder. With the right plants, designs, and tricks, you can have a yard that’s low-maintenance, eco-friendly, and eye-catching. Whether you're starting fresh or looking to make a few swaps, I've rounded up 10 awesome ideas that’ll help you save water without sacrificing style.
1. Go Native with Your Plants
First things first, when it comes to saving water, native plants are a no-brainer. These are the plants that naturally grow in your region, so they're already adapted to your climate, soil, and rainfall (or lack of it).

They don’t need much pampering. Once they’re established, they practically thrive on neglect and who doesn’t want that?
Popular picks:
  • If you're in the Southwest? Try agave, yucca, or desert marigold.
  • Midwest folks? Look into purple coneflower or black-eyed Susan.
  • California? Manzanita and California poppy are top choices.

Native plants support local wildlife, too, so you'll get butterflies and birds dropping by just to say thanks.
2. Swap Grass for Groundcovers
Let’s talk about that thirsty patch of green most of us call a lawn. Traditional turfgrass sucks up a ton of water like, thousands of gallons a year kind of ton.

If you want to save water (and never mow again hallelujah), consider swapping your grass for drought-tolerant groundcovers. These hardy little plants spread out nicely, cover the soil, and need way less water than grass ever dreamed of.
Groundcover favorites:
  • Creeping thyme: Smells amazing and can handle foot traffic.
  • Sedum: Comes in tons of colors and is crazy easy to grow.
  • Dymondia: Low-growing, silver-green, and perfect for sunny areas.

Groundcovers also reduce erosion, keep weeds out, and help your yard look lush without all the effort.
3. Mulch Like a Pro
If mulch isn’t already your landscaping sidekick, it’s time to become BFFs. A thick layer of mulch helps lock in moisture, regulate soil temperature, and keep weeds in check. That means less watering and less weeding.
A few mulch options to try:
  • Wood chips or bark, natural and great for most gardens.
  • Gravel perfect for a desert or minimalist look.
  • Compost mulch feeds your soil as it breaks down.

Spread it 2–3 inches deep around your plants and trees, but don’t let it touch the stems or trunks they like in their personal space.
4. Install Drip Irrigation
Soaker hoses and drip irrigation are like the slow cookers of the landscaping world, efficient, low-effort, and totally reliable.

Instead of blasting water into the air like a sprinkler, a drip system delivers water right to the plant roots where it’s needed. You’ll waste way less water (no evaporation or runoff), and your plants will thank you.

It might take a weekend to install, but once it's in, you’re golden. Many systems can even hook up to a smart timer so you can water in the early morning while you sleep in.
5. Get Smart with Your Hardscaping
Want to seriously cut down on your water use? Add more stuff to your yard that doesn’t need watering at all.

We’re talking hardscaping things like patios, walkways, gravel paths, or decorative rocks. These can break up your yard visually while reducing the total area you need to water.
Ideas to try:
  • A gravel firepit seating area.
  • A flagstone path lined with drought-tolerant herbs.
  • A dry creek bed made with river rocks and succulents.

Hardscaping doesn’t have to feel cold or boring to mix materials and textures to keep things interesting and cozy.
6. Use Rainwater (Yes, Even in a Drought)
I know it sounds ironic to talk about rainwater in a drought article, but even dry regions get the occasional downpour. Why not put that water to good use?

Rain barrels are simple to set up and can catch water from your roof for future use in your garden. They’re perfect for watering potted plants or garden beds.

Just make sure to keep the lid on tight to avoid mosquitoes unless you want to host a bug rave every weekend.
7. Group Plants with Similar Water Needs
Here’s a sneaky trick to save water and avoid overwatering: put your plants into zones based on how thirsty they are.
Here's what that might look like:
  • High-water zone (if needed): right by your front door or patio, where you want a lush look and can easily water.
  • Medium-water zone: shrubs and perennials that don’t need constant care.
  • Low-water zone: succulents, cacti, and native grasses that basically run on fumes.

This way, you’re not wasting water on desert plants that hate wet feet or stressing out your thirsty ferns by sticking them in the sun with a cactus roommate.
8. Say Hello to Succulents
Succulents are the poster children of drought-tolerant plants and for good reason. They store water in their leaves, they come in about a million shapes and colors, and they’re ridiculously easy to take care of.

You can plant them directly in the ground, stick them in pots, or even make a living wall. Mix and match to get some serious visual drama.
Some stunners to consider:
  • Echeveria — rosette-shaped and picture-perfect.
  • Aloe vera — healing and hardy.
  • Hens-and-chicks — great for rock gardens or container clusters.

They’re especially good if you forget to water for a week or two. Or three. We won’t judge.
9. Design for Shade
Here’s a little secret, the more shaded your yard is, the less water you’ll need. Shade helps reduce evaporation, keeps your soil cool, and protects tender plants from getting scorched.
You can create shade with:
  • Pergolas or trellises covered in drought-tolerant vines like bougainvillea or trumpet vine.
  • Strategically placed trees like mesquite or palo verde (both drought-tolerant!).
  • Shade sails or umbrellas over sitting areas.

Plus, a shady corner just begs for a hammock and a cold drink.
10. Create a Zen-Inspired Rock Garden
Sometimes, the best way to save water is to just stop fighting nature altogether. If your region is super dry, lean into it with a Zen rock garden.

Use gravel, sand, and larger stones to create a peaceful space that’s all about textures and contrast. Toss in some driftwood, a few sculptural plants (like red yucca or blue fescue), and maybe a bench or two, and boom you’ve got a minimalist oasis that barely needs a drop of water.

Bonus: rock gardens are super low-maintenance. No mowing, trimming, or fertilizing. Just raking the gravel once in a while is enough to keep it looking sharp.
Bonus Tips: Extra Water-Saving Hacks
Alright, if you’re still thirsty for more ideas (pun absolutely intended), here are a few extra tricks:
  • Water early or late in the day, this keeps the sun from stealing your moisture.
  • Fix leaks — even a tiny drip adds up fast.
  • Use a broom, not a hose — don’t spray down your driveway!
  • Let your grass go dormant — it’ll bounce back after the dry season.
  • Skip the pressure-washing unless absolutely necessary (except for air duct cleaning utah - those guys have the gear for it).
Final Thoughts
You don’t need to live in a lush rainforest to have a yard that makes your neighbors do a double-take. Drought-resistant landscaping is all about working with your environment, not against it. By choosing the right plants, rethinking your layout, and getting a little creative, you can have a gorgeous, water-smart space that’s easier on the eyes and the wallet.

So whether you’re planning a total yard makeover or just want to swap out a few high-maintenance plants, start with one or two of these ideas. Over time, you’ll create a space that’s not only beautiful but built to thrive no matter what the weather throws at it.
Image by: Freepik

When to Aerate Your Lawn for Maximum Growth (By Season)

“How
If you’ve been staring at your lawn wondering why it looks tired, patchy, or just kinda “meh” no matter how much you water it or mow it hey, you’re not alone. There’s a hidden hero in the world of lawn care that a lot of folks overlook: aeration.

Yep, punching little holes in your lawn might sound weird (or maybe even wrong), but it can be one of the best things you do all year to encourage lush, green, healthy grass. The catch? Timing matters a lot.

So, when’s the best time to aerate your lawn for maximum growth? Well, it depends on the season, your grass type, and a few other factors. Grab a drink, sit back, and let’s break it down together, season by season.

What Even Is Lawn Aeration?
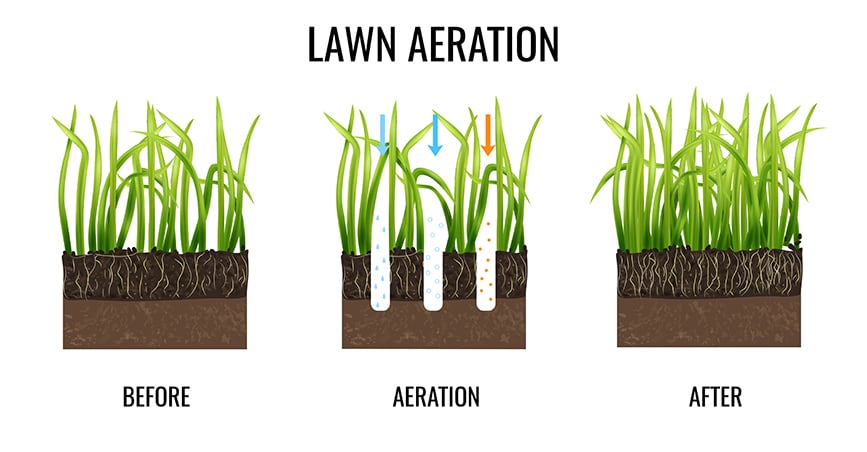
First things first, if you're new to lawn care or just haven't heard much about this, aeration is basically the process of poking holes into your lawn's soil. You do this to help air, water, and nutrients dive deep into the roots.

Over time, soil gets compacted from people walking, mowing, rain, snow, pets doing laps, and kids playing tag. When the soil gets tight and packed, the grass roots can’t breathe or grow properly. It’s like trying to grow a plant in a jar of concrete. Not gonna happen.

By aerating, you’re opening up the soil again, giving the roots space to spread and soak up all the good stuff. It’s a simple trick with big rewards.

So, When Should You Aerate?
There’s no one-size-fits-all answer, but a good rule of thumb is: aerate during your grass’s growing season. That way, it can recover quickly and take full advantage of the loosened soil. Let’s break it down by season.

Spring: The “Sometimes” Season
Is spring a good time to aerate?
Yes but with some conditions.
Pros:
  • The grass is waking up from winter.
  • It’s starting to grow and can recover from aeration.
Cons:
  • If you aerate too early, the soil might still be wet and cold.
  • Spring weeds like dandelions and crabgrass LOVE open soil.
  • If you plan on using a pre-emergent herbicide (aka weed preventer), wait to aerate. Aerating after applying it can break the chemical barrier and make it less effective.
Best For:
  • Cool-season grasses like Kentucky bluegrass, ryegrass, and fescue.
  • If you live in a northern climate with a short growing season.
Spring Aeration Tips:
  • Wait until your lawn is actively growing-think mid to late spring.
  • Avoid soggy soil; it can clump and mess up the holes.
  • Follow up with overseeding if your lawn is looking patchy.
Pro tip: If your lawn has a thick layer of thatch (that’s the dead, spongy stuff between the grass and soil), you can combine dethatching and aeration in spring for a double win.

Summer: The “Hold Up” Season
Should you aerate in summer?
Usually, no. But there are a few exceptions.
Why summer isn’t ideal:
  • It’s hot.
  • The grass is stressed.
  • The soil dries out fast.
  • Your grass might not recover well from the holes you’re making.
But, and this is a big but if you have warm-season grass(like Bermuda, zoysia, or St. Augustine), and you live in a southern region, late spring to early summer can actually be perfect. That’s when these grasses are actively growing and can bounce back fast.
Best for:
  • Warm-season grasses in southern regions.
  • Lawns with irrigation systems (because you’ll need to water more often after aerating in summer).
  • Homeowners who’ve missed spring and don’t want to wait till fall.
Summer Aeration Tips:
  • Aerate early in the morning or late in the evening-avoid mid-day heat.
  • Keep your lawn watered before and after aeration.
  • Don’t fertilize right after you don’t want to burn the grass when it’s already under heat stress.
Fall: The MVP of Lawn Aeration
Is fall the best time to aerate?
Heck yes, for most lawns!
Why fall rocks:
  • Temperatures cool down, but the soil is still warm.
  • Your lawn isn’t under heat stress anymore.
  • There’s usually plenty of rain, which helps the soil stay soft.
  • There are fewer weeds to compete with your grass.
Best for:
  • Cool-season grasses in northern climates.
  • Lawns that had a rough summer.
  • Preparing your yard for a killer growing season next spring.
Fall Aeration Tips:
  • Aim for early to mid-fall don’t wait until it’s freezing.
  • Combine aeration with overseeding to fill in any bare spots.
  • Water well for a couple of weeks after.
Bonus tip: If you’re only going to aerate once a year, fall is the season to pick.
Winter: Hard Pass
Should you aerate in winter?
Nope. Don't do it.
Here’s why:
  • The ground is cold, possibly frozen.
  • Your grass is dormant and won't recover from aeration holes.
  • You might do more harm than good by compacting wet or frozen soil even more.
The only exception?
If you live in a very warm climate where winter feels more like a mild spring, and your grass is still growing, you might sneak in some late-season aeration. But honestly? Just wait for spring.

How to Know Your Lawn Needs Aeration
Okay, now that we’ve walked through the seasons, you might be wondering if your lawn even needs aeration. Here are some easy ways to tell:
1. You’ve got heavy foot traffic.
Dogs, kids, backyard BBQs-these all press the soil down over time.
2. Water pools in spots or runs off.
That means the soil is compacted and can’t absorb water properly.
3. You see a lot of thatch.
If it’s more than half an inch thick, aeration can help.
4. Your lawn feels like walking on concrete.
Go barefoot and give it the foot test. It should feel soft and bouncy.
5. Poor growth, despite care.
If you’re doing all the right things watering, mowing, fertilizing and your lawn still looks tired? It might be time to poke some holes and let it breathe.

How to Aerate (The Right Way)
Okay, so let’s say you’re ready. You’ve picked the right season for your lawn type. Now what?
Step 1: Choose your tool.
You’ve got two main options:
  • Spike aerators (they push holes into the soil)
  • Core aerators (they remove little plugs of soil)
Go with core aeration if you can. It’s way more effective.
You can rent one from a local garden center or hire a lawn care company to do it

Step 2: Prep your lawn.
  • Mow the grass shorter than usual.
  • Water a day or two before (don’t aerate bone-dry soil).
  • Mark any sprinkler heads, you don’t want to punch through those.
Step 3: Aerate.
  • Go over the lawn in rows.
  • If the soil is super compacted, go over it twice in different directions.
  • Leave the plugs on the lawn, they’ll break down naturally.
Step 4: Follow up.
  • Water regularly for a couple of weeks.
  • Overseed if needed.
  • Fertilize with a gentle formula.
A Quick Note on Lawn Love and Other Home Care
While we're chatting about getting air into your soil, let’s talk about the air in your home for a sec. Just like compacted soil can choke your lawn, clogged vents can suffocate your HVAC system. If you’re around Utah and your home’s been feeling stuffy, check out air duct cleaning Orem services. A clean duct system helps your whole home breathe easier-just like your lawn after aeration.

Final Thoughts (But No Essay Stuff, Promise)
Aeration might not be the flashiest part of lawn care, but trust me-it’s a game-changer. Whether you're trying to rescue a tired lawn or just keep it looking fresh, punching a few holes can go a long way.
So here’s the takeaway:
  • Cool-season grass? Aerate in fall or spring.
  • Warm-season grass? Aim for late spring to early summer.
  • Avoid winter, and be cautious in the heat of summer.
  • Watch your lawn for signs it’s feeling suffocated.
  • And hey, give it some love afterward—water, seed, and maybe a little fertilizer.
Ready to aerate? Your lawn’s going to love you for it. Now go outside, take a barefoot stroll across that grass, and start planning. You’ve got this.

The Best Low-Maintenance Grass Types for Busy Homeowners

“Guy
Let’s be real, if you’re like most homeowners, you want your yard to look great, but you don’t want to spend every weekend babysitting your lawn. Between work, errands, family time, and maybe even a little “me time,” who’s got hours to mow, water, weed, and reseed?
If that sounds like you, then you’re in the right place. I’ve got the scoop on the best low-maintenance grass types that’ll keep your yard looking green and gorgeous without eating up your free time. We're talking less mowing, less watering, and less stressing because your lawn should work for you, not the other way around.
Let’s dive in.
Why Low-Maintenance Grass Matters
You might be wondering, “Is there really a difference between one type of grass and another?” Oh yes, friend. It’s like comparing a cactus to a rose bush. Both have their charm, but one is clearly easier to deal with.
Low-maintenance grasses grow slower, need less water, and are more resistant to pests and disease. That means you spend less time behind a lawnmower or dragging a hose around the yard. It also means less money spent on fertilizers, herbicides, and yard guys.
So if you want a lawn that doesn’t suck the life out of your weekends, you’ll want to keep reading.
1. Bermudagrass – The Sun-Loving Champ
Best for Southern and warm climates
Bermudagrass is the golden child of hot weather lawns. It’s tough, fast-spreading, and thrives in the sunniest parts of your yard. This grass is a favorite for golf courses and sports fields so you know it can handle foot traffic like a champ.
Why it’s low-maintenance:
  • Super drought-resistant
  • Grows thick and crowd-outs weeds naturally
  • Once established, it doesn’t need a lot of pampering
Heads-up: It does go dormant and turns brown in the winter. But hey, it always comes back strong when it warms up again.
2. Zoysiagrass – The Ultimate Chill Lawn
Best for: Warm climates (but can handle a bit of cold too)
Zoysia is like that laid-back friend who just gets you. It’s not demanding, and it doesn’t freak out with a little neglect. It grows slowly (which means less mowing), and it forms a super dense turf that keeps weeds out and barefoot feet happy.
Why it’s low-maintenance:
  • Slow growth = fewer trims
  • Drought-tolerant
  • Handles foot traffic and recovers well
One catch: It takes a while to get going. Once it’s established, though, it’s one of the easiest grasses to live with.
3. Tall Fescue – The Cool-Weather Warrior
Best for: Cooler climates (like the Northern U.S.)
Tall fescue is the MVP for homeowners in chillier regions. It’s got deep roots, which makes it great at sucking up water and that means less irrigation on your end. It also stays green longer into fall and even tolerates some shade.
Why it’s low-maintenance:
  • Grows well in poor soil
  • Drought-tolerant
  • Fewer diseases and pests to worry about
Tall fescue does grow fast, so you might have to mow it more often than Zoysia or Bermuda. But overall, it’s a super forgiving grass.
4. Buffalograss – The Native Tough Guy
Best for: Midwest and dry climates
Buffalograss is native to the prairies of North America, which means it's literally built for survival. It doesn’t need a lot of water or mowing, and it’ll hold its own even when the sun’s beating down and the rain is MIA.
Why it’s low-maintenance:
  • Needs very little water once it’s settled in
  • Rarely needs mowing (like 4–6 times a year!)
  • Doesn’t demand fertilizers
Downsides? It doesn’t love heavy foot traffic. So if your yard doubles as a football field for the neighborhood kids, you might want something hardier.
5. Centipedegrass – The "Plant and Forget It" Option
Best for: Southeast U.S., acidic soil areas
Centipedegrass is sometimes called the “lazy man’s grass” and that’s not an insult. This grass is perfect if you don’t want to do much of anything. It spreads slowly, so you won’t need to mow a lot. It also requires little to no fertilization.
Why it’s low-maintenance:
  • Doesn’t grow fast (so yay, less mowing!)
  • Low fertilization needs
  • Doesn’t get many pests or diseases
It’s not super wear-resistant, though, so maybe skip this one if you’ve got a lot of backyard barbecues or soccer games.
6. Fine Fescue – The Shade-Lover’s Best Friend
Best for: Shaded or cool areas
If your yard is full of trees or shady corners, fine fescue might be your new best bud. It thrives in low light and doesn’t need much help from you to stay healthy.
Why it’s low-maintenance:
  • Requires little water
  • Rarely needs fertilizer
  • Grows slowly and doesn’t mind neglect
The blades are super thin and soft, too kind of like grass with spa vibes. It might not handle a ton of activity, but for quiet lawns, it’s a dream.
Quick Comparison Chart
Grass Type Best Climate Water Needs Mowing Frequency Foot Traffic Tolerance
Bermudagrass Hot/Sunny South Low Medium High
Zoysiagrass Warm + Mild Cold Low Low Medium-High
Tall Fescue Cool North Low-Medium Medium High
Buffalograss Dry Midwest Very Low Very Low Low-Medium
Centipedegra Southeast Low Very Low Low
Fine Rescue Cool/Shady Very Low Very Low Low
Tips to Make Any Grass Lower Maintenance
Okay, so choosing the right grass type is the biggest step. But you can also make things easier by managing your lawn smartly. Here’s how:
1. Mow Higher
Keep your mower blade set higher (around 3 inches). Taller grass shades out weeds, holds moisture better, and grows stronger roots. That means less work for you.
2. Water Deep, Not Often
Instead of sprinkling daily, give your grass a deep soak once or twice a week. It trains the roots to grow deeper and handle drought better.
3. Leave Clippings
Don’t bag those clippings, let them fall back into the lawn. They act like free fertilizer. Win-win.
4. Don’t Over-Fertilize
More fertilizer doesn’t mean a better lawn. In fact, it just makes the grass grow faster (which means more mowing). Use slow-release fertilizers and apply sparingly.
Artificial Turf: Should You Go Fake?
If you’re really over the whole mowing-watering-weeding situation, there’s always artificial turf. It’s come a long way since the shiny green plastic stuff of the '90s.
Today’s synthetic grasses can look pretty darn real, and they’re completely maintenance-free (other than an occasional rinse or sweep). The big trade-off? Cost. It’s expensive upfront, but you’ll save a lot over time no mower, no water bill, no Sunday sweat.
Oh, and it’s allergy-friendly, too. Just sayin’.
What About Lawn Alternatives?
Not into grass at all? You’re not alone. More homeowners are swapping traditional lawns for eco-yards with ground covers, gravel paths, native plants, and even clover or moss.
Here are a few alternatives that require almost no work:
  • Creeping thyme: Smells amazing, handles foot traffic, and flowers in the summer.
  • Clover: Stays green, never needs fertilizer, and bees love it.
  • Moss: For shaded, damp areas it’s lush and peaceful.
One Random But Real Tip
Speaking of low maintenance, don’t forget about what’s under your home too. If you ever notice musty smells or allergies that won’t quit, your air system might be part of the problem. It’s a good idea to look into air duct cleaning Heber City or your local area, especially if you’ve recently done yard work or live somewhere dusty. Clean air, clean lawn, happy life.
Final Thoughts: Pick the Grass That Fits You
At the end of the day, the “best” grass is the one that suits your lifestyle, your region, and your energy levels. There’s no shame in choosing something low-effort; it doesn't make your lawn any less beautiful.
Whether you go for the tough Zoysia, the breezy Buffalograss, or even jump into the world of clover lawns or turf, the goal is to have a yard you actually enjoy without needing a full-time landscaping crew.
So grab your lemonade, kick back in that lawn chair, and let your low-maintenance lawn do its thing.

How to Revive Dead Grass: A Step-by-Step Guide for a Lush Lawn

“Raking

Ever looked out your window and sighed at your sad, brown patch of what used to be grass? Trust me, you’re not the only one. Whether it’s from a heatwave, pet damage, disease, or just plain neglect, dead grass happens. But here’s the good news: your lawn might look hopeless now, but with a little patience and the right steps, it can bounce back.

Grab your gloves, water hose, and a little determination. Let's talk about how to revive dead grass and bring your lawn back to life. You might even enjoy the process. Yep, I said it!
Step 1: Diagnose the Problem (Don’t Skip This)
Before you go throwing seed or fertilizer on your lawn, you’ve gotta play detective.
Brown vs. Dead
First, is your grass really dead or just dormant? Dormant grass is like a hibernating bear. It turns brown to conserve energy especially in hot or dry conditions but it’s still alive. Dead grass, on the other hand, is gone for good.
Here’s a trick: grab a patch and tug gently. If it pulls up easily with no resistance, it’s dead. If it holds on tight, it’s probably just dormant.
What Killed Your Lawn?
Figure out what caused the damage. Some common culprits include:

  • Lack of water (especially in summer)
  • Too much foot traffic
  • Pet urine
  • Pests like grubs
  • Fungal diseases
  • Over-fertilization or poor soil
Once you know the "why," you'll be able to plan your comeback strategy properly.
Step 2: Clean Up the Mess
If you’re dealing with actual dead patches, start by getting rid of what’s no longer serving your lawn.

  • Rake up dead grass and any debris.
  • Remove weeds that have taken advantage of the bare space.
  • If you see thatch (that spongy layer just above the soil), dethatch your lawn with a dethatching rake or a machine.
Why bother? Because this step makes room for new growth and lets nutrients, water, and air get where they need to go down to the roots.
Step 3: Aerate the Soil (Let It Breathe)
If your lawn has compacted soil thanks to heavy foot traffic, for example your grass roots won’t get the oxygen they need.
Aerating involves poking holes in the soil to allow air, water, and nutrients to reach the roots. You can rent a core aerator or use a manual aerating tool. Yes, it takes time, but it’s a total game changer.
Bonus tip: Aerate when the soil is moist, not bone dry or super soggy.
Step 4: Test and Improve Your Soil
This step might not sound exciting, but soil testing is low-key magic. You can get a DIY test kit from a garden center or send a sample to a local extension office.
What you’ll learn:

  • Is your pH off?
  • Are you low on key nutrients?
  • Do you need to improve drainage?
Based on the results, you might need to add lime, sulfur, or specific fertilizers. You might also consider mixing in compost or organic matter to improve texture and fertility.
Think of it as prepping the perfect bed for your grass to sleep in.
Step 5: Reseed or Sod—Pick Your Method
Now it’s time to choose your path: reseeding or sodding. Both have their perks.
Reseeding
Best for: Widespread thinning, smaller dead patches.
  • Choose the right grass seed for your region (cool-season or warm-season).
  • Mix the seed with topsoil or compost to help it settle and grow.
  • Use a seed spreader for even coverage.
  • Gently rake the area to make sure the seeds have good soil contact.
  • Add a light layer of straw mulch to keep moisture in and birds out.
Sodding
Best for: Larger areas that need quick results.
  • Remove the top layer of dead grass.
  • Level the soil and add compost.
  • Lay sod pieces tightly together like puzzle pieces.
  • Water immediately and often (more on that below!).
Whichever route you go, your grass will need TLC in the early stages.
Step 6: Water Like a Pro
This step can make or break your new grass.

  • Water lightly but frequently at first. Think 2–3 times a day for the first week.
  • Once the seeds germinate (usually 7–14 days), start cutting back to once a day, then every other day.
  • Eventually, you want deep, infrequent watering to encourage deep root growth.
Pro tip: Early morning is the best time to water. Evening watering can lead to fungal growth.
Step 7: Fertilize at the Right Time
  • Don’t go crazy with fertilizer on day one. New grass can be sensitive, and too much nitrogen early on can burn it.
  • Use a starter fertilizer after the grass has had a couple of weeks to settle in. Follow the instructions to avoid overdoing it.
  • Once your grass is well-established (think 6–8 weeks), you can switch to a regular feeding schedule based on your grass type.
Step 8: Keep Off the Grass (For Now)
New grass is like a baby-super delicate. Try to keep pets, kids, and foot traffic off the area while it grows. If you absolutely must walk on it, lay down some planks or boards to distribute your weight.
Step 9: Mow Smart
Wait until your grass is at least 3 inches tall before giving it the first haircut. And don’t mow it super short follow the one-third rule: never remove more than one-third of the grass blade at a time. Sharp blades matter too. Dull mower blades can rip your new grass and stress it out.
Step 10: Maintenance for Long-Term Lushness
Congrats! If you’ve made it this far, your lawn should be looking a lot better. But the key to keeping it lush is ongoing love. Here’s how:

  • Mow regularly, but don’t scalp your lawn.
  • Fertilize seasonally based on your grass type.
  • Aerate once a year, ideally in the fall or spring.
  • Keep it hydrated, especially during dry spells.
  • Watch for pests and diseases, and treat early if you spot anything funky.
What If It’s Still Not Working?
If you’ve done everything and your lawn still looks like a crunchy mess, it might be time to call in a pro. You could be dealing with an issue like:

  • Soil compaction that’s too deep to fix on your own
  • Severe grub infestation
  • Hidden fungal issues
  • Or even something unrelated, like poor yard drainage or a nearby tree sucking up all the nutrients
Sometimes a professional lawn care service can pinpoint the issue faster and offer more advanced solutions.
Bonus: When to Consider Starting Fresh
Sometimes, it’s just not worth trying to save the entire lawn. If more than 50% of your lawn is dead and patchy, you might want to:

  • Kill off everything with a non-selective herbicide.
  • Wait a few weeks.
  • Regrade, amend the soil, and start from scratch.
It’s more work up front, but you’ll be amazed at the long-term results.
Pro Tip from Left Field: Don’t Forget What’s Under the Lawn
Yep, I’m talking about the stuff underneath like irrigation systems, buried cables, or even air ducts if you’re near the home’s perimeter. I once met a guy in Sandy who completely revamped his yard but didn’t check the ductwork near his crawl space. Turned out his home needed air duct cleaning Sandy services because all the lawn dust and debris had gotten into the vents. Just saying sometimes healthy grass starts with a healthy home!
Final Thoughts (But Not an Essay Ending, Promise)
Reviving dead grass takes work, but it’s 100% doable with a little sweat and patience. Your lawn doesn’t need to look like a golf course overnight. Just take it step by step, and celebrate small wins-like that first green sprout popping up.

You’ve got this. And hey, once your lawn is back to being green and glorious, grab a chair, pour a cold drink, and admire the heck out of it. You earned it.

2015 © ProParts Direct. All Rights Reserved. Privacy Policy | Site Map Design & Development by The Scribbit The Scribbit - Marketing, Graphic Design and Web Development