 |
| Quick Snapshot |
- Want a yard that looks stunning but still works for real life? The right mix of outdoor tiles and artificial turf can turn unused space into a stylish, comfortable, and practical retreat.
- From slip-resistant patio tiles to soft turf zones for kids, pets, and relaxing, every design choice can shape how your outdoor space feels, functions, and lasts.
- Thinking about upgrading your yard without creating a high-maintenance headache? This guide walks you through smart layout ideas, material choices, installation tips, and design mistakes to avoid—so your yard feels beautiful, balanced, and built for everyday living.
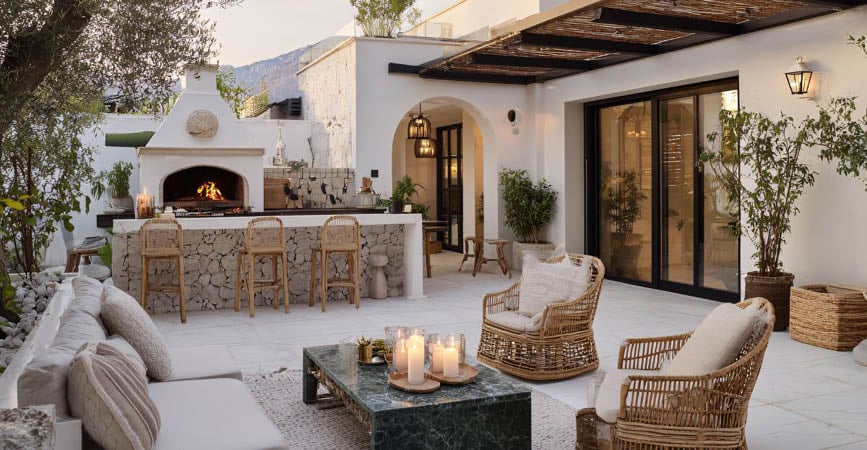
A well-designed yard is not only about making the space look attractive. It should also feel comfortable, handle daily use, drain properly, and remain easy to maintain over time. This is where the combination of outdoor tiles and artificial turf becomes especially effective.
Tiles provide structure, stability, and defined usable areas, while turf adds softness, greenery, and visual balance. When planned correctly, these two materials can turn an ordinary yard into a polished outdoor space for dining, relaxing, entertaining, playing, or improving the overall appearance of your home.
The key is not simply placing tiles and turf together. The real value comes from choosing the right materials, creating a practical layout, managing drainage, and designing each zone with a clear purpose.
|
| Why Tiles and Turf Work So Well Together in Yard Design |
Tiles and turf solve different outdoor design problems, which is why they work well as a pair. Tiles are ideal for areas that need a firm, stable surface, such as patios, walkways, outdoor kitchens, and seating zones. Turf works better in areas where comfort, greenery, and a softer appearance are needed.
Used together, they prevent the yard from feeling too hard or too plain. A fully tiled yard can look cold and rigid, while a fully turfed yard may lack structure and practical surfaces for furniture or foot traffic. Combining both gives the space a cleaner layout and a more balanced finish. |
| • How Tiles Improve Outdoor Functionality |
Outdoor tiles are especially useful where durability and stability matter. For example, dining tables, lounge chairs, fire pits, and barbecue stations need a level surface that will not shift under weight. Tiles also help define specific zones, making the yard feel more organized and intentional.
The right tile choice can also influence safety and comfort. Textured porcelain, natural stone, and concrete pavers provide better grip than smooth indoor-style tiles. This is important for areas exposed to rain, pool water, or irrigation overspray.
Tiles are also valuable for high-traffic spaces. A tiled path from the back door to the garden, pool, or seating area prevents turf from wearing down in one narrow strip. This keeps the yard looking cleaner for longer.
|
| • How Turf Adds Comfort and Visual Warmth |
Artificial turf softens the look of hardscape areas and gives the yard a green, finished appearance throughout the year. It works especially well in spaces where natural grass struggles, such as shaded corners, narrow side yards, rooftop terraces, or areas with heavy foot traffic.
Turf also makes the yard more usable for children, pets, and lounging. Instead of relying only on hard surfaces, homeowners can create comfortable open areas that feel more relaxed. When placed between or around tiles, turf helps break up large paved sections and creates a more natural transition between functional zones.
For a more realistic appearance, choose turf based on use, not only color. A dense, medium-pile turf works well for family yards, while shorter, firmer turf is often better for pets, putting areas, or narrow decorative strips between pavers.
|
| Planning the Layout Before Installing Tiles and Turf |
| A strong yard design begins with layout planning. Before choosing colors or patterns, decide how the space will be used. A yard meant for entertaining needs different surfaces than a yard designed mainly for children, pets, or quiet relaxation.
Start by dividing the yard into zones. Common zones include a dining area, lounge area, walking path, play area, garden border, and open green space. Tiles should be used where stability is needed. Turf should be used where softness, comfort, or visual relief is more important. |
| • Outdoor Living and Dining Areas |
For patios and dining areas, tiles are a better foundation. Outdoor furniture needs a flat, solid surface to prevent wobbling. Large-format porcelain pavers or concrete tiles can create a clean, modern look, while natural stone gives the space a warmer and more organic feel.
Turf can be used around the tiled patio to soften the perimeter. This prevents the outdoor living area from looking isolated and helps it blend into the rest of the yard. For a more custom look, turf strips can also be installed between large pavers, but spacing must be planned carefully so chairs and tables do not sit unevenly.
|
| • Walkways and Garden Paths |
Tiles are ideal for walkways because they guide movement and protect the turf from repeated foot traffic. A stepping-stone path surrounded by turf works well in relaxed garden designs, while a continuous tiled walkway is better for areas used daily.
For comfort and safety, walkway tiles should be wide enough for natural movement. Narrow stepping stones may look decorative, but they can become inconvenient if they are used as the main path through the yard. If the path leads to a gate, pool, outdoor kitchen, or storage area, function should take priority over appearance.
|
| • Play Areas and Family Spaces |
In family yards, turf is often the better surface for open play areas because it feels softer underfoot and creates a cleaner space for children. However, tiles should still be included nearby for seating, storage boxes, shade structures, or play equipment bases.
Avoid placing smooth tiles directly in active play zones, especially where children may run after rain or near water features. If tiles are used in these areas, choose textured outdoor-rated surfaces and keep transitions between turf and tile level to reduce tripping risks.
|
| • Garden Borders and Decorative Features |
Tiles can be used to frame garden beds, water features, fire pits, or decorative planters. This creates visual order and prevents the yard from looking unfinished. Turf can then fill the surrounding space, giving contrast to stone, concrete, or ceramic finishes.
This approach is especially effective in smaller yards. Instead of using too many plants, materials, and colors, a simple combination of tile borders and clean turf sections can make the space feel larger and more controlled. |
| Choosing the Best Outdoor Tiles for Your Yard |
| Not all tiles are suitable for outdoor use. Indoor tiles may become slippery, crack under weather changes, or fade over time. For yards, focus on tile strength, surface texture, water resistance, heat exposure, and maintenance needs. |
| • Porcelain Pavers |
Porcelain is one of the most practical choices for modern outdoor spaces. It is dense, water-resistant, and available in finishes that resemble stone, concrete, or timber. Outdoor porcelain pavers are especially useful for patios, pool surrounds, and pathways because they offer a clean appearance with relatively low maintenance.
For yards with artificial turf, porcelain works well because it creates sharp, neat lines against the greenery. Stone-look porcelain can give a natural effect without the sealing requirements of some real stone materials.
Best for: modern patios, pool areas, tiled walkways, low-maintenance yards. |
| • Natural Stone Tiles |
Natural stone adds texture and character that manufactured materials cannot fully duplicate. Slate, travertine, granite, and limestone can create a premium outdoor look, especially when paired with turf. The slight variation in color and surface texture makes the yard feel more natural and less manufactured.
However, natural stone usually needs more care than porcelain. Some stones are porous and may require sealing to protect against stains, moisture, and weathering. Stone selection should also consider climate. For example, some materials may become hot in direct sunlight or slippery if polished too smoothly.
Best for: rustic gardens, luxury patios, Mediterranean-style yards, feature paths.
|
| • Concrete Tiles and Pavers |
Concrete pavers are a strong choice for homeowners who want a clean, architectural appearance. They work especially well in geometric layouts where turf strips are placed between large square or rectangular pavers.
Concrete can create a bold and minimalist look, but it should be properly sealed or finished depending on the design and exposure. Lighter shades can help reduce heat absorption, while textured surfaces improve grip.
Best for: contemporary yards, stepping paths, geometric turf-and-paver designs.
|
| • Clay and Terracotta Tiles |
Clay and terracotta tiles bring warmth and character to outdoor spaces. Their earthy tones pair beautifully with green turf, especially in Mediterranean, Spanish, cottage, or courtyard-style gardens.
These tiles are more style-specific than porcelain or concrete, so they should be used carefully. They work best when the rest of the yard supports the same design language through planters, walls, outdoor furniture, and warm-toned accents.
Best for: courtyards, garden patios, Mediterranean landscapes, warm traditional designs.
|
| Installing Artificial Turf Correctly for Long-Term Results |
| Artificial turf only looks good when the base underneath it is prepared properly. Poor installation can lead to uneven surfaces, drainage problems, wrinkles, sinking areas, and visible seams. flawless turf finish depends more on the groundwork than on the turf itself.A |
| • Prepare and Level the Area |
Remove existing grass, weeds, roots, rocks, and loose soil. The area should be shaped to support drainage, not perfectly flat in a way that traps water. A slight slope away from the house or toward a drainage point helps prevent puddling.
This stage is especially important when turf is installed beside tiles. Both surfaces should meet at a clean, even height. If the turf sits too high, it can create a tripping edge. If it sits too low, the transition may look unfinished. |
| • Build a Stable Base |
A compacted base of crushed rock or decomposed granite helps create a firm foundation. This layer supports drainage and prevents the turf from shifting or sinking over time. The base should be compacted evenly, especially in areas that will receive heavy foot traffic.
Skipping this step is one of the most common mistakes in turf installation. Turf placed directly over soil may look acceptable at first, but it often becomes uneven after rain, use, or ground movement.
|
| • Use a Weed Barrier Where Needed |
A weed barrier can help reduce weed growth beneath the turf. However, it should not block drainage. Choose a permeable landscape fabric so water can still move through the surface and base layer.
This is especially important in yards where turf is installed between tiles or pavers, because trapped moisture can lead to odor, weeds, or loose edges.
|
| • Cut, Fit, and Secure the Turf Cleanly |
Turf should be rolled out and allowed to settle before final trimming. Cuts should be made carefully around tile edges, garden borders, drains, and posts. Clean edges make the difference between a professional-looking installation and a rushed one.
Secure the turf with appropriate nails, staples, or adhesive depending on the surface and installation type. Edges should be fixed firmly to prevent curling, especially around walkways and patio borders.
|
| • Choose the Right Infill |
Infill helps the turf blades stand upright, adds weight, improves comfort, and supports drainage. Silica sand is commonly used for general landscaping, while pet-friendly infill may be better for yards used by dogs. Rubber infill can add softness but may become warmer in direct sun.
The best infill depends on how the yard will be used. A decorative turf strip between pavers may need less infill than a family lawn or pet area.
|
| Creating a Balanced Design with Tiles and Turf |
| The most attractive tile-and-turf yards look intentional. The materials should not feel randomly placed. Each surface should have a clear role in the layout.
|
| • Use Tiles to Define Purpose |
| Tiles should mark areas where people sit, walk, cook, or gather. For example, a tiled patio beside the house can serve as the main entertaining space, while a turf section beyond it can act as a visual extension and relaxation area.
This creates a yard that is both beautiful and practical. Guests naturally understand where to walk, where to sit, and where the open green space begins.
|
| • Use Turf to Break Up Hard Surfaces |
Too much tile can make a yard feel hot, harsh, or commercial. Turf helps soften the overall design by adding color and texture. It works especially well between large pavers, around seating zones, or as a central green panel surrounded by tiled borders.
The goal is contrast. Tiles should provide structure, while turf should provide relief.
|
| • Keep Transitions Clean |
The edge where turf meets tile is one of the most visible details in the yard. Uneven cuts, height differences, and loose edges can make the whole design look unfinished.
Use proper edging, compact the base carefully, and ensure both materials sit at compatible heights. In high-end designs, clean transitions are often what make the space look professionally planned.
|
| • Match the Design Style |
The tile style should match the overall mood of the yard. For a modern space, large concrete-look or stone-look porcelain pavers with narrow turf joints can work well. For a rustic garden, irregular natural stone with surrounding turf may feel more appropriate. For a warm courtyard, terracotta tiles with rich green turf can create a more inviting effect.
Avoid mixing too many tile colors, shapes, and finishes. A simple material palette usually looks more expensive and ages better.
|
| Practical Maintenance Tips for Tiles and Turf |
| Tiles and turf are low-maintenance compared to many traditional landscaping materials, but they still require proper care. Maintenance should focus on preserving drainage, cleanliness, surface safety, and material appearance. |
| • Tile Maintenance |
Sweep tiled areas regularly so dirt, leaves, and sand do not build up in joints or corners. For deeper cleaning, use water and a mild outdoor-safe cleaner. Avoid harsh chemicals that may damage sealers, grout, or nearby turf.
Inspect tiles after heavy rain or seasonal changes. Look for loose pavers, cracked tiles, uneven sections, or grout damage. Repairing small issues early prevents larger problems later.
If natural stone is used, check whether it needs sealing. Sealing can help protect against stains from food, soil, leaves, and outdoor furniture. The sealing schedule depends on the stone type and exposure.
|
| • Turf Maintenance |
Brush turf fibers occasionally, especially in high-traffic areas where they may flatten. This helps maintain a fuller and more natural appearance.
Remove leaves, branches, and debris before they settle into the turf. A leaf blower or soft rake can make this easier. Rinse the turf when needed to remove dust, pollen, or pet residue.
For pet areas, cleaning should be more frequent. Rinse the surface regularly and use turf-safe deodorizing products when necessary. Also check drainage performance, because poor drainage can lead to odor and bacteria buildup.
|
| • Maintain the Tile-Turf Edges |
The border between tiles and turf should be checked regularly. Loose turf edges, lifted corners, or soil movement can affect both appearance and safety. Re-secure edges as needed and keep joints clear of weeds or debris.
This small detail has a major impact on the final look of the yard. |
| Common Mistakes to Avoid When Combining Tiles and Turf |
| A tile-and-turf yard can look beautiful, but poor planning can make it uncomfortable or difficult to maintain. Avoid these common mistakes: |
✓ Do not choose smooth indoor tiles for outdoor areas. They can become slippery and may not withstand weather exposure.
✓ Do not install turf without a compacted base. The surface may sink, ripple, or drain poorly.
✓ Do not ignore drainage. Both tiles and turf need water management, especially near the house, pool, or outdoor kitchen.
✓ Do not use too many materials. Mixing several tile styles with turf can make the yard feel busy rather than elegant.
✓ Do not create narrow decorative paths that are difficult to walk on. A beautiful walkway should still be comfortable and functional.
✓ Do not place turf where heat buildup will be uncomfortable without considering shade, lighter materials, or surrounding ventilation.
|
| Conclusion |
Transforming your yard with tiles and turf is one of the most effective ways to create an outdoor space that feels polished, comfortable, and practical. Tiles bring structure, durability, and defined purpose, while turf adds softness, greenery, and year-round visual appeal.
The best results come from thoughtful planning. Choose outdoor-rated tiles, prepare a proper turf base, manage drainage, and design each zone around how the space will actually be used. When tiles and turf are integrated with clean transitions and a balanced layout, your yard becomes more than a decorative area. It becomes a functional outdoor extension of your home.
With the right material choices and installation approach, tiles and turf can help you create a yard that is easier to maintain, more enjoyable to use, and visually appealing in every season. Start planning your outdoor transformation today and enjoy the perfect balance of nature and design.!!
|